Adding Free Reverse Spirals to Alignments
To add a free reverse spiral-spiral (between two curves)
Add a free reverse spiral-spiral group between two curves that are in different directions.
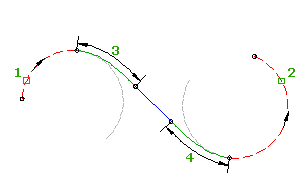
The two spirals bend in opposite directions. Spiral parameters and attachment points are automatically calculated. If either of the attachment curves (1, 2) are edited, the spiral-spiral group maintains tangency.

By default, the two spirals have equal lengths and A values. Both values can be modified at the time of creation by specifying a ratio of A1/A2 or L1/L2.
- Click the alignment. Click

 Find.
Find. - On the Alignment Layout Tools toolbar, click
 Free Reverse Spiral-Spiral (Between Two Curves).The current spiral definition is displayed at the command line.
 - Specify the entity before and the entity after to which you want to add the spiral.
- Optionally, enter a value for the ratio of A1 to A2, or select Length and enter a value for the ratio of L1 to L2. Otherwise, the A values and lengths of each spiral will be equal.Note: If the curves are in the same direction, a compound solution is given. Enter Yes at the command line to accept the solution, or enter No to restart the command. There is no solution if the curves cross, or for concentric curves.
To add a free reverse spiral-line-spiral (between two curves, spiral lengths)
Add a free reverse spiral-line-spiral group, with specified spiral lengths, between two curves.
The two spirals bend in opposite directions. You specify the spiral lengths (2, 3). The line length is automatically calculated. If either of the attachment curves (1, 2) are edited, the spiral lengths do not change.

In this command you can specify the spiral parameters, but not the line length. Line length is calculated automatically.
- Click the alignment. Click

 Find.
Find. - On the Alignment Layout Tools toolbar, click
 Free Reverse Spiral-Line-Spiral (Between Two Curves, Spiral Lengths).The current spiral definition is displayed at the command line.
 - Specify the entity before and the entity after to which you want to add the spiral.
- Specify either the length or the A value for the spiral in and the spiral out.Specify a new value, or press Enter to accept the value that is displayed on the command line.
- If the alignment has design criteria applied to it, the minimum value for the current design speed is displayed.
- If the alignment does not have design criteria applied to it, the default value specified in the curve and spiral settings is displayed.
Note: If the curves are in the same direction, a compound solution is given. Enter Yes at the command line to accept the solution, or enter No to restart the command. There is no solution for concentric curves.
To add a free reverse spiral-line-spiral (between two curves, line length)
Add a free reverse spiral-line-spiral group, with a specified line length, between two curves.
The two spirals bend in opposite directions. You specify the line length (3). The spiral lengths are automatically calculated. If either of the attachment curves (1, 2) are edited, the line length does not change.

- Click the alignment. Click

 Find.
Find. - On the Alignment Layout Tools toolbar, click
 Free Reverse Spiral-Line-Spiral (Between Two Curves, Line Length).The current spiral definition is displayed at the command line.
 - Specify the entity before and the entity after to which you want to add the spiral.
- Specify the line length.
Note: If the curves are in the same direction, a compound solution is given. Enter Yes at the command line to accept the solution, or enter No to restart the command. There is no solution for crossing or concentric curves.

0 Comments:
Post a Comment
Subscribe to Post Comments [Atom]
<< Home