Creating Surface from 3D Faces in Autodesk Civil 3D
Note: To create a surface from 3D Faces, create a boundary outlining 3D faces and create surface from it.
1. Optional* Run LINEWORKSHRINKWRAP command and select all 3D Faces from which the surface needs to be created. This will create a polyline around future Surface.
2. From Home ribbon, Create Ground Data click on Surfaces > Create Surface.
3. In Create Surface dialog name the surface, select Style, rendering material and click OK.
4. In Prospector tab, Expand Surfaces node, expand the surface (named in previous step) and expand Definition.
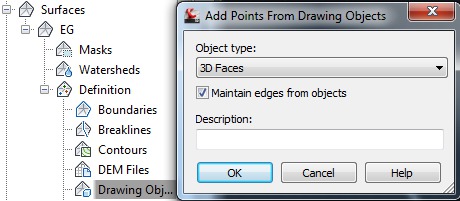
5. Right-click on Drawing Objects, select 3D Faces and check “Maintain edges from objects” and click OK.
6. Program will create Surface out of 3D Faces.

7. In Prospector tab expand surface’s Definition node and right-click on Boundaries and select Add.
8. In Add Boundary dialog name the boundary and select a polyline created in step 1.
9. This will create a boundary around the surface showing pretty close to what was on the 3D Faces.

posted by Feature and Technology @ June 18, 2019
0 Comments
![]()

0 Comments:
Post a Comment
Subscribe to Post Comments [Atom]
<< Home