Editing Survey Figure Vertices
- Open the Figure Properties dialog box by doing one of the following:
- Right-click a figure in the drawing
 Edit Survey Figure Properties.
 - In the drawing select a figure. On the Figure contextual tab, click Survey Figure Properties
- Right-click a figure in the drawing
- Find.
- Click
 to expand the dialog box.
 - Use the icons to perform editing operations.
- In the list view Number or Name column, you can clear the value to disassociate the vertex from the referenced survey point. Enter a new point number or name if necessary. When the Number or Name column is clear, the Easting, Northing, and Elevation columns are enabled and you can edit those values.
Expand
the Survey Figure Properties dialog box where you have editing options
for each figure vertex displayed in the list view.
You
can add, remove, reorder, and change the point identifier (name or
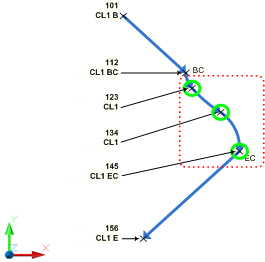
number) for each survey figure vertex. Figure preview graphics are
displayed in the drawing indicating the selected vertices. An arrow head
is displayed at the end of each segment to indicate the order
(direction) of the figure vertices. Specify the color for the current
vertex in the Interactive Graphics section of the Survey User Settings.
The following illustration shows an example of the figure preview graphics:
posted by Feature and Technology @ January 24, 2020
0 Comments
![]()

0 Comments:
Post a Comment
Subscribe to Post Comments [Atom]
<< Home